PASSIVE HOUSE RETROFIT, OAKVILLE, ON
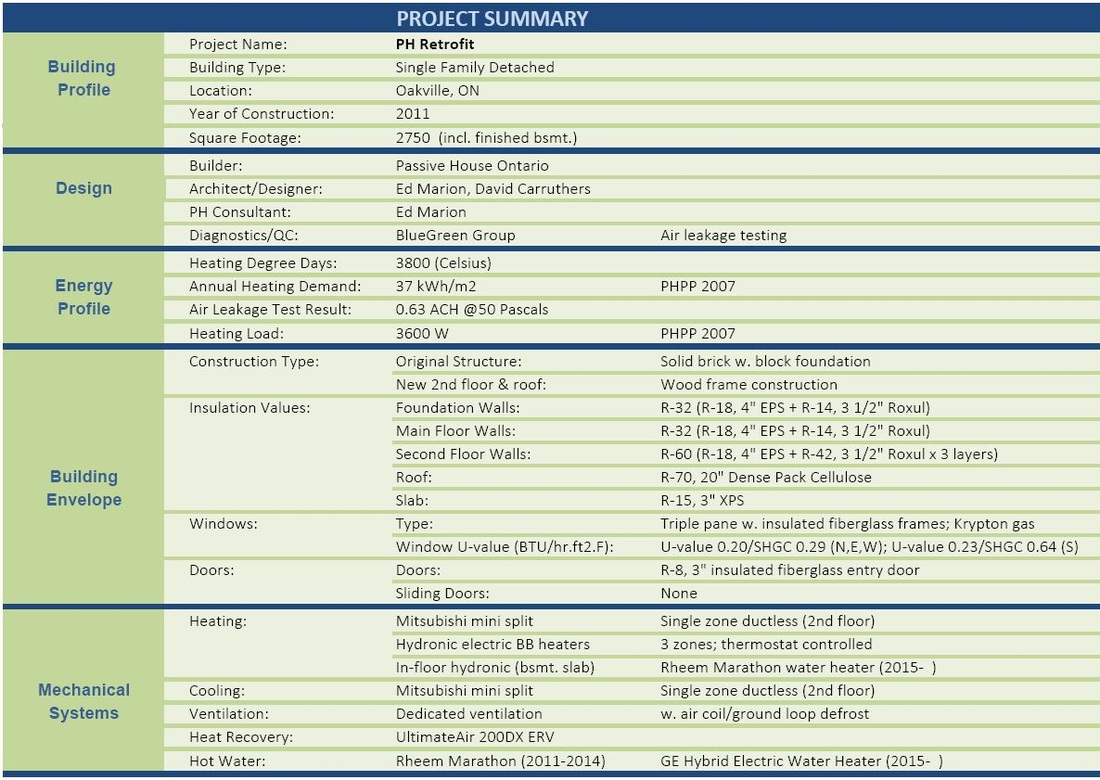
Passive House Retrofit, Oakville, Ontario
In 2009, Ed and his wife Lucy decided to use their existing home as a training project for Passive House design and construction.
Their original idea was to demolish the entire house and build new but then they decided to do a retrofit instead. While a new-build would likely have yielded a home with a superior building envelope with near PH performance numbers, they decided that it was more important to try and work with the existing building as much as possible . Although building new low-energy homes is important it's perhaps more instructive to try and figure out how to upgrade the thousands of existing homes that are ill-equiped for an energy-challenged future. The plan decided on - a retrofit of the existing building plus the addition of a new second floor - yielded a broad range of experiences in both retrofit and new-build scenarios.
In the case of a retrofit, there’s only so much you can do. Some of the cards - building shape, solar orientation - have already been dealt. But sizeable improvements in efficiency are still possible. Their home went from being a cold and drafty brick and block bungalow plagued by freezing cold walls and floors in wintertime to a super-comfortable story and a half with no hot or cold spots, no drafts, and little temperature variation between floors. Below is a summary of how they got there.
Location
This project site is located in Oakville, Ontario, about 50 kms southwest of Toronto along the shore of Lake Ontario. Proximity to the lake- less than 2 km as a crow flies- has a moderating effect on the climate. In the summer, the site benefits from the cool breezes that blow off the lake, while the winter typically receive less snowfall than communities located just a few kilometres to the north. Click here to see a map of the area. PHPP contains climate data for the Toronto area which was used to model the project during the planning/design phase. The PHPP metric climate data shows 90 kKh of heating degree days- that's roughly 6750 heating degree days in Fahrenheit.
Solar Orientation
The amount of solar energy available to a home has a significant impact on how much heat will be required to keep it warm in winter. Prior to the advent of furnaces, homes would not have been built without windows that capture the sun's free energy- they simply would not have been comfortable. Modern subdivisions are now full of homes that have poor or no solar access, their interior comfort wholly reliant on mechanical heating systems. Is this a good strategy for sustainable building?
The project's main solar facade faces exactly 45 degrees southeast which is good but not great. Passive House guidelines suggest a due south exposure plus or minus 30 degrees so at 45 degrees southeast this site is beyond the ideal. Still, it was decided to go ahead with the project although if the deviation from south had been any more extreme, they would have looked for a better site.
Below is a diagram that shows sun angles at different times of the year. It was used to determine the optimal size of the roof overhangs relative to the new window scenario so they would keep the summer sun from overheating the space.


Design & Planning
The building envelope rarely enters into the discussion when people are planning to build or renovate. Building Code sets the minimum requirements and the conversation moves on to things like roof lines and kitchen cabinets. On this project, considerable planning time was invested in trying to maximize the efficiency of the building envelope. It’s difficult to upgrade an envelope after the fact. Whatever decisions you make while you are in the planning phase will have an effect on how much energy a building uses for its entire life cycle so it’s worth looking at options beyond what the building code mandates.
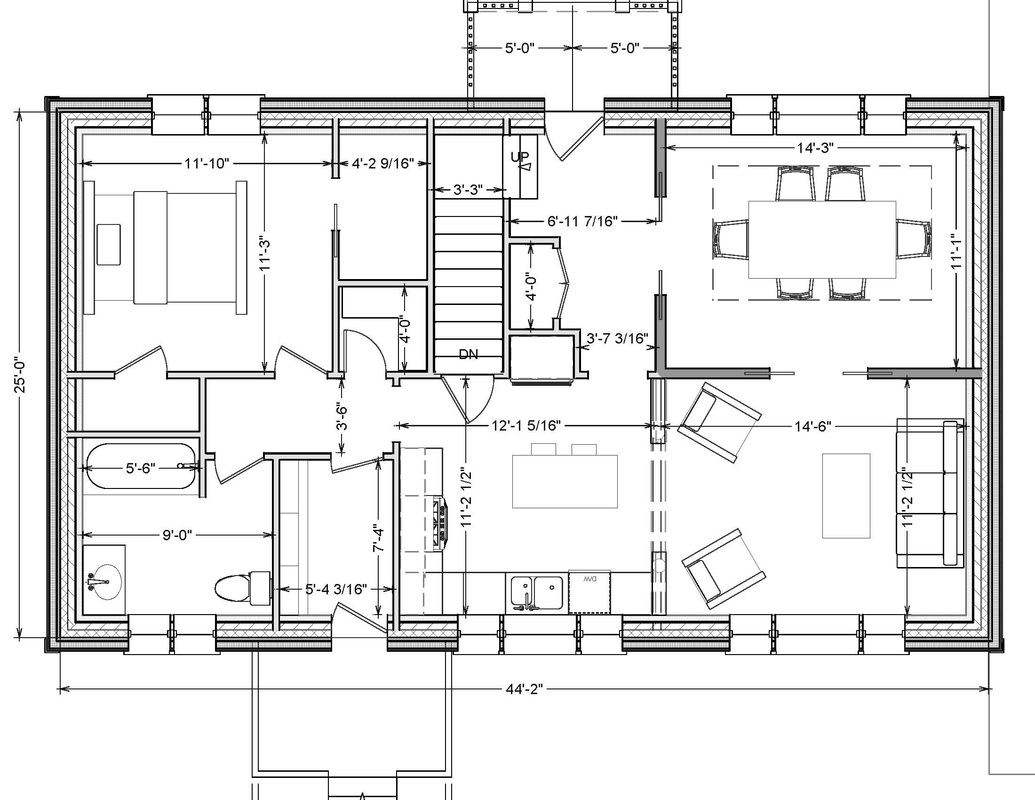
That doesn't mean that flow and layout and interior finishes are not important. These things were also given plenty of consideration in the design process as was the strategy to maximize the interaction between natural daylighting and our typical daily activities.
That doesn't mean that flow and layout and interior finishes are not important. These things were also given plenty of consideration in the design process as was the strategy to maximize the interaction between natural daylighting and our typical daily activities.

Structural preparation
Our new plan called for the addition of a second floor with a shed dormer on the south side. This necessitated replacing the existing 5-ply 2x10 spruce support beam with a 4-ply 10" LVL. At this time I also levelled the existing floor platform, which was out by as much as 1" from front to back (a distance of 25') in preperation for the new wall framing. This was a big job as every floor joist needed to be set free from the mortar pocket that held it to the foundation wall.
Floor/wall framing
With the new beam in place it was time to edit the first floor platform to accomodate a new stair situation. I was originally going to keep the diagonal wood-strip subfloor but (wisely) decided to replace it with new plywood. I waited until this was done before removing the roof and proceeding with the new exterior wall and window scenario.
Second floor framing
How do you add a new, perfectly level second floor on top of an existing masonry structural wall that is far from being level? Making the new 1st floor significantly higher than the original, say 9' instead of 8', would have allowed a one foot high knee wall to be built around the perimeter compensating for the off-levelness along the way. In hindsight, that's probably what I should have done. Instead, we put a double plate on top of the masonry wall and shimmed it level all the way around. This made the first floor ceiling height 8'3"- a bit of an odd size for optimizing lumber and drywall, but now that it's done, that height does have a nice feel to it.
Roof framing
The chief focus of the roof was on designing an assembly that could deliver lots of R-value, be thermal bridge-free, lend itself well to extreme air sealing, and not tower over the existing streetscape. To minimize heat loss, windows and dormers were left off of the street/northern side. A shed dormer was added on the south side to create ample headspace and allow for increased glazing. I underestimated the ability of truss designers to build trusses for this fairly steep cathedral-style roof. The original plan called for a hand-cut TJI roof with structural ridge. Happily, a truss system was designed that simplified the whole process.
Air sealing and window rough-ins
There isn't a connection on the entire building where I didn't ask myself, "How is this going to affect air tightness? Does this assembly have drying potential? Is this a thermal bridge-free detail?" It was my first attempt at realizing these ambitious goals set by Passive House design requirements. How far do you go with the caulking and taping? In the end, I felt it was better to err on the side of redundancy.
Excavation and slab demolition
With the framing done and the roof more or less watertight, it was time to excavate around the perimeter in preparation for the exterior insulation. To maximize the continuity and effectiveness of the thermal envelope we planned to insulate right down to the footing on both sides of the foundation wall. We also made the decision to remove the excavated clay soil from the site. The removal of the clay facilitated working conditions but the principal reason to remove it was the desire to backfill, after the exterior insulation was installed, with sand which would compact quickly and not lead to the potential long term settling problems associated with clay soil. It was a good move - there has been little noticeable settling a year and a half after the sand fill was compacted.
Exterior Insulation- Part 1
Insulating a building from the outside has its advantages. For one, it can mitigate many of the thermal bridge issues that are inherent to solid masonry-style construction and that is good, but several other things also need to be considered. How will the walls eventually be finished? Stone? Stucco? Siding? How are all the layers going to be integrated? What type of drainage/venting will be required? Whatever exterior insulation strategy is selected must address all of these issues.
There are several foam-type products available for exterior insulation. Most of the time, the foam gets covered with stucco but we wanted to use bevelled siding. The siding needs to be installed on strapping with a proper vent/drain space. After much research, we decided to use the R-Etro EPS insulation system by Quadlock, a maker of ICF products. Quadlock is one of the few domestic ICF suppliers that offers insulation panels that are more than the usual 2 1/2" thick. We chose a 4 " thick, R-18 product that uses a proprietary fastener system that is amenable to most types of exterior claddings. The fasteners, installed on 16" or 24" centers, connect 1x4 foot insulation panels to the building with screws. The fasteners themselves have a flange that allows subsequent layers of materials to be securely attached.
There are several foam-type products available for exterior insulation. Most of the time, the foam gets covered with stucco but we wanted to use bevelled siding. The siding needs to be installed on strapping with a proper vent/drain space. After much research, we decided to use the R-Etro EPS insulation system by Quadlock, a maker of ICF products. Quadlock is one of the few domestic ICF suppliers that offers insulation panels that are more than the usual 2 1/2" thick. We chose a 4 " thick, R-18 product that uses a proprietary fastener system that is amenable to most types of exterior claddings. The fasteners, installed on 16" or 24" centers, connect 1x4 foot insulation panels to the building with screws. The fasteners themselves have a flange that allows subsequent layers of materials to be securely attached.
Exterior Insulation- Part 2
With the trench back-filled and compacted, we could now continue with the R-Etro EPS installation.
Floor Slab
One of the principles of Passive House design is the placement of a continuous layer of insulation around the entire building envelope. The heat loss through an uninsulated basement slab is considerable. I had hoped to get at least 4-6" of XPS under the new 4" concrete slab but the site conditions- already low ceiling height, shale substrate- only allowed a maximum of 3" (R-15).
Windows and doors
There's a lot to know about windows. For a technical overview of Passive House windows, click on one of the links listed at the bottom of the PH Design tab of this site.
Sufficient to say that windows are one of the most important and costly elements of a building. Because they allow sunlight to penetrate into the living space, they are a source of aesthetic beauty and free heat energy, but also potentially the point of greatest heat loss when sunlight is absent (ie. during a cold winter night). Ever sit next to a window and feel the cold radiating down you? Humans can sense the difference in surface temperatures of objects - windows, walls, floors - when they enter a room. Windows in Passive Houses need to have glass surface temperatures that are within 4-5 degrees C of the other surface temperatures in a room, affording the overall space excellent thermal comfort.
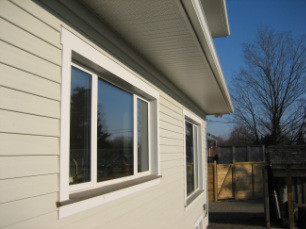
A Passive House window needs to have excellent thermal properties right across its individual components - glass, frames, spacers, and the way it is installed into the rough opening. In our heating-dominated climate, triple glazing is required to achieve good thermal performance and superior comfort of the occupants. Frames need to be insulated (a feature that is sorely absent from most windows available in our market) and the installation needs to be done in a manner that minimizes/eliminates thermal bridging. We selected windows from Thermotech Fiberglass with triple-paned, krypton-filled glazing units mounted in insulated fiberglass frames. Fiberglass is strong and expands at about the same rate as glass which increases the longevity of the units by minimizing the movement between glass and frame. Casements were chosen as the operators because of their superior air sealing properties.
The window prep and install was by far the most labour intensive part of this project. From resizing the rough openings, to building and installing all the plywood boxes that span the thick walls, air-sealing all the joints, machining sills, building jamb extensions on both the inside and outside of the windows etc. It would have been far simpler to order the windows with brick mold and flush-mount them against the sheathing layer as is usually done thus elliminating the need for a sill or exterior jamb extensions/trim but... the heavy triple-glazed windows needed to be supported by a structural member therefore they could not be installed at the outside edge of the plywood box where they would have potentially sagged in the foam plane. There were many lessons learned. In the end, the windows turned out well and add a pleasing aesthetic dimension to the house, both inside and out.
How much glazing should you add to your plan? The PHPP aids designers in their window placement/sizing by providing constant feedback on the energy balance as determined by the windows' thermal properties, solar orientation, and shading parameters.
Sufficient to say that windows are one of the most important and costly elements of a building. Because they allow sunlight to penetrate into the living space, they are a source of aesthetic beauty and free heat energy, but also potentially the point of greatest heat loss when sunlight is absent (ie. during a cold winter night). Ever sit next to a window and feel the cold radiating down you? Humans can sense the difference in surface temperatures of objects - windows, walls, floors - when they enter a room. Windows in Passive Houses need to have glass surface temperatures that are within 4-5 degrees C of the other surface temperatures in a room, affording the overall space excellent thermal comfort.
A Passive House window needs to have excellent thermal properties right across its individual components - glass, frames, spacers, and the way it is installed into the rough opening. In our heating-dominated climate, triple glazing is required to achieve good thermal performance and superior comfort of the occupants. Frames need to be insulated (a feature that is sorely absent from most windows available in our market) and the installation needs to be done in a manner that minimizes/eliminates thermal bridging. We selected windows from Thermotech Fiberglass with triple-paned, krypton-filled glazing units mounted in insulated fiberglass frames. Fiberglass is strong and expands at about the same rate as glass which increases the longevity of the units by minimizing the movement between glass and frame. Casements were chosen as the operators because of their superior air sealing properties.
The window prep and install was by far the most labour intensive part of this project. From resizing the rough openings, to building and installing all the plywood boxes that span the thick walls, air-sealing all the joints, machining sills, building jamb extensions on both the inside and outside of the windows etc. It would have been far simpler to order the windows with brick mold and flush-mount them against the sheathing layer as is usually done thus elliminating the need for a sill or exterior jamb extensions/trim but... the heavy triple-glazed windows needed to be supported by a structural member therefore they could not be installed at the outside edge of the plywood box where they would have potentially sagged in the foam plane. There were many lessons learned. In the end, the windows turned out well and add a pleasing aesthetic dimension to the house, both inside and out.
How much glazing should you add to your plan? The PHPP aids designers in their window placement/sizing by providing constant feedback on the energy balance as determined by the windows' thermal properties, solar orientation, and shading parameters.
Interior insulation
Passive House design aims to achieve deep reductions in annual heating demand and in our climate that requires a considerable amount of insulation. Generally speaking, walls will typically need R-40 to R-50 while roofs will require R-60 to R-100. It seems like a lot but the idea is to reduce your dependence on fossil fuels and complex mechanical intervention and that means making a one-time, up-front investment in building envelope.
The EPS insulation we added to the outside amounted to R-18 - nowhere near the amount required for passive design. That meant adding insulation to the inside as well which we did by framing standard-type 16" O.C. 2x4 stud walls and filling them with mineral wool insulation (ROXUL). The 3 1/2" ROXUL batts added R-14 per layer to the mix which brought the overall R-value of the main floor and basement walls in the original part of the house up to R-36, as calculated by PHPP (including some, albeit small, R-value contribution from the existing masonry wall).
The absence of masonry in the all-new second floor scenario allowed us to frame a double stud wall which is basically two walls separated by a cavity, in this case 3 1/2" in depth (to accomodate the ROXUL batts). The double stud wall was filled with three layers of ROXUL (R-14 x 3= R-42) which, when combined with the exterior EPS insulation (R-18) resulted in an assembly with a value of R-60+. Nice!
Exterior detailing
The thermal envelope complete, it was time to apply the finishing layer of material, bevelled wood siding and trim. The Cape Cod factory painted siding (from New Brunswick) is installed over 3/4" strapping to allow for proper ventilation. The air flows behind the siding and up through the roof ridge vent, even on the gable ends. The recessed windows and gable end walls required a considerable amount of effort to detail but, in the end, we were really happy with the final exterior appearance of the house.
Mechanical
Somewhere in my introduction I alluded to the fact that if you design a small, efficient building envelope, it will require only a small mechanical system. The PHPP calculated the heat load - the amount of heat required to maintain design temperature (20 C) on the coldest day of the year - at just under 4 kW/hr. (13,000 BTU/hr.). To put that in perspective, a small furnace has a minimum capacity of about 12 kW/hr. (40,000 BTU/hr). Finding the simplest, most efficient, properly-sized mechanical system was one of the more challenging assignments posed by this project.
The high level of air tightness necessitates mechanical ventilation to supply the house with fresh air. To achieve this we installed a high-efficiency ERV with a dedicated duct system. We chose the UltimateAir RecoupAerator 200DX ERV because of its high level of heat recovery efficiency (up to 95%) compared to other domestic models. The RecoupAerator slowly and steadily supplies a continuous stream of fresh, filtered air into the house while exhausting stale air and contaminants. To minimize the length of the duct runs, we installed the supply branches to the main living areas (bedrooms, living/dining/family rooms etc.) in the floor (similar to a traditional forced-air system) except for in the basement where we installed them in the ceiling. The exhaust branches were located on the ceilings of the bathrooms, kitchen, and laundry room.
Because our heating and cooling demands are so low, we decided early on to eliminate the natural gas and go with an all-electric system. I don't know if this will prove to have been the best strategy. At this time, May 2012, a kW of energy delivered by natural gas costs less than half of that delivered by electricity. Still, you can do without natural gas but you pretty much need electricity so we took a calculated risk on going all-electric.
Several electric heat sources were installed, partly so we could experiment with different systems to see what worked best. A 2.5kW in-line heater is installed in the ductwork on the supply side of the ERV. When the thermostat, which is mounted in a central location on the first floor, calls for heat, the in-line heater turns on and the ERV is automatically kicked into high speed (200 CFM) to meet the heat demand as quickly as possible. When the set point is reached the heater turns off and the ERV goes back to a slower rate (80 CFM) of airflow.
Electric baseboard heaters were also installed at various points throughout the house to provide an alternate heat distribution method and to supplement the in-line heater when maximum capacity is required. The heaters are controlled by programmable thermostats which, because we have time-of-use metering ("smart" meters), allows us to minimize their on-peak usage. This was the principal method we used for heating over the past winter. Three baseboard heaters delivered heat in the dining room, main floor bathroom, and basement family room. The heat mixed in nicely - there were no hot or cold spots in the house.
Finally, we installed a ductless mini-split Mitsubishi system chiefly to provide cooling but also to provide heat . Mini-split units are the darlings of the ultra-low energy house community because they offer high levels of comfort and efficiency at various levels of output. The system comprises of an outdoor compressor coupled to an indoor air handler (hence the word split) which draws air in from the ceiling (hence the term ductless) and passes it over a coil heating or cooling it in the process before sending it into the interior space. In cooling mode it blows air into the home at a gentle 22 or 23C as compared to the much colder air, 15 to 16C delivered by a conventional furnace A/C condenser sytem. The Mitsubishi Mr. Slim sytem quietly and effortlessly cooled the entire house on the lowest setting, delivering a steady stream of cool, dry air from its position high on a second floor wall.
The system also delivers heat down to -20C at an efficiency factor (COP) of up to 300% compared to electric resistance heating.
Its proximity high on the second floor allowed it to heat that level in short order but the heat didn't seem to migrate to other parts of the house. It could be operator error - I'll experiment with it next heating season. Perhaps a ceiling fan near the stairwell (the electrical device box is roughed in) could help move some of the heated air down to the main floor.
All of these systems combine to keep the house extremely comfortable. There are no hot and cold spots and little temperature stratification between floors. During the heating season coventional homes often need higher temperature set points: 21 to 23C to compensate for hot and cold zones, stratification etc. but our home is very comfortable at an interior temperature of 20C.
Where heating water for domestic use is concerned we chose a simple system - an electric tank. No moving parts. No venting required. Reasonable cost (around $700 for our Rheem Marathon water heater). Heating water accounts for a considerable amount of our energy use (3 to 5 kWh/day) so we try and use it responsibly (without being fanatical about it). We may integrate some renewable systems in the future if a simple, reasonably-priced alternative comes along.
Interior detailing
Although the main focus of this project is on building envelope, I thought I would include some of the interior details that add to the enjoyment of our home.